| Home | Empennage | Wings | Fuselage | Controls | Canopy | FWF | Panel |
|
|
Fuselage Last Update: June 24, 2011 |
I purchased the Harmon Rocket II kit from a local builder. He had built it to roughly the "Quickbuild" stage, and stopped when it was still easy to personalize. Perfect for me! I looked all over the world for a kit in this condition. I found an ad on Barnstormers... and it ended up I could have walked to the fellow's house! Needless to say, this was ideal. Here a few as-built photos:


I decided to move my battery and ELT mounting aft to improve CofG and provide more room in the baggage compartment. This involved modifying the existing baggage pans, fabricating a doghouse for the bellcrank and devising a new trays.
First, I redesigned the baggage compartment and designed the doghouse:
(photos to follow)
To mount the aft battery, I beefed up the existing floor stiffeners with 3/4" 0.063 angle and mounted trays for an ELT and the battery. The battery mount is designed to take either a Concorde or PC680 battery. I will stick with the Concorde because I want the extra weight and capacity.
I redesigned the bellcrank mount to incorporate a hardpoint for a TruTrak pitch servo. This puts the servo a bit further aft than the stock TruTrak install kit so that it clears the bulkhead. Supporting the hardpoint is a bracket tied to the battery tray that also supports the main electrical Contactor. It's possible to mount two contactors to this bracket (one on front and one on back) if I want to have a ground power contactor.
Floor Stiffeners:

ELT Tray (sorry about the focus-- my Canon TX-1 was dying at this point):
Battery Tray and Contactor mounting bracket:

Bellcrank Mount, with extension for pitch servo hardpoint tied into contactor mounting bracket:

More Detail:


After trying to decipher the plans for the HRII and referring to the F1 Rocket plans, I decided to angle my panel by about 8 degrees from the datum (longerons). To do, I made some brackets that turned out really well. I split the panel into two small side panels, plus the main panel. Spacers on the frame helped to support the panel at the top.


The previous builder could not fit the rear seat bulkhead to the skins. I chopped off the existing flange, and fabricated a new one out of 0.032 strip stock. I cut fingers for the skin attachment and used my Avery shrinker for the bulkhead attachment.
After much measuring and futzing, I drilled the new flange to the skin first, then mounted the bulkhead with a strap tie down. After making sure everything was aligned, I drilled the bulhead to the new flange. Everything worked out fine. It sure helps that I've built an airplane before, if this was my first I'd still be fretting. Divine the intent, determine a solution and move forward!


The previous builder drilled the tailspring and tail gear weldment a bit oversize. I was not comfortable with this sloppy bolt fit, so I attempted to enlarge the 1/4" hole to 5/16" undersize to use a larger bolt.
This did not go well. I used an underpowered 3/8" electric drill to attempt the hole enlargement. This was a mistake, as the drill was underpowered and bogged down. This work-hardened the steel and caused chattering. The short story is that I had to replace the weldment and tail spring and start again.
I took the parts, plus the full-swivel tail wheel yoke to a local machine shop for match drilling. They did so, making the main bolt slightly undersize ('D' as I recall). The yoke was predrilled, so they matched the yoke holes and drilled the tail spring to 3/16". I enlarged the main bolt hole using an 1/4" undersize straight reamer.
Success! Using an AN174 close tolerance bolt, the main bolt fit was tight, and selecting a couple of 3/16" bolts for the yoke mount gave me a snug fit as well.
Removing the old weldment required de-riveting the aftmost bulkhead. I match drilled the new weldment after very careful alignment. To do this, I made 1/4" drill bushing from some aluminum standoffs I have from my electronics business. Using these bushings, I drilled up from initial 3/32" all the way to the finished hole size, finishing with a straight reamer.

Roll servo mount and comm antenna location

Roll servo and comm antenna wiring. Unterminated connector will be for servo power and autopilot disconnect switch. This wiring includes the splitter and cable to the pitch servo.

Aft fuselage wiring

ADAHRS mounting tray. Capable of holding two Dynon ADAHRS units.

Aft fuselage wiring showing battery tray, ELT tray, bellcrank, pitch servo mount (servo missing) and rudder tirm system.

Center fuselage, left side showing Roll trim servo and relays for seat heaters that are mounted to trim bracket. Transponder antenna in lower right of picture. Blade is mounted on inside tmporarily for storage.

Access panel covers. Modified to require only the two screws on bottom for attchment. The cover has a tongue that slides up into a slot formed between the interior retainer plate and the fuselage skin. The retainer plate is held off the skin with 3/32 washers dimpled with my squeezer set. This forms a slot into which the cover tongue will slide.


Aft Stick cover, before modification for seat.

Front Stick cover and crotch belt hold-down.

Left side eyeball light mounting. Doubles as a hard point for alternate static source valve.


Right side eyeball light mounting. Doubles as the hard point for dimmer modules.

Note that the top dimmer module has been cut away to allow access to terminal block on bottom module.


Throttle quadrant mount. When skin is attached, the mounting rails provide a holder for charts slid down between the rails and skin.

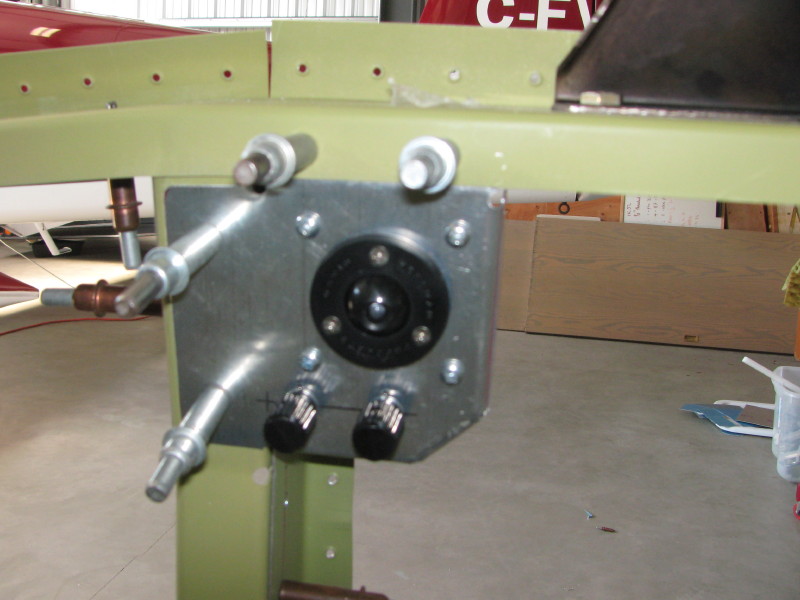
Engine mount fitted for drilling.

Fuselage on the gear. Notice that the canopy remains set in the intermediate position. Details on how I did this are on the canopy page.

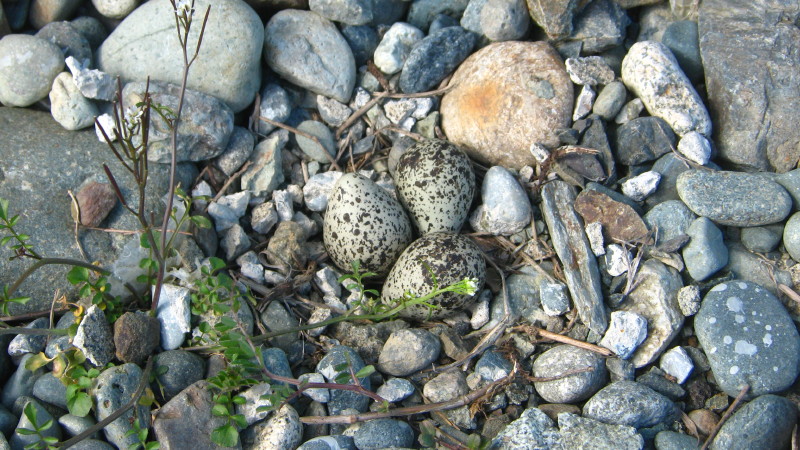
Momma airplane (in the back). Papa airplane in the front.

And just outside my hangar door, three little baby aircraft under construction. This is a Kildeer's nest. Momma Kildeer is learning to tolerate me and not raise a ruckus everytime I'm near.